Sunday, February 27, 2011

Unlimited Rapidshare Downloads


Its very easy to fool Rapid Share server if your IP address is assigned by your ISP. Just follow these simple steps:

clean up IE or netscape cookie( In this case the one that belong to rapidshare website)
On Command prompt
type -----> ipconfig /flushdns <---Enter
type -----> ipconfig /release <---Enter
type -----> ipconfig /renew <---Enter
type -----> exit <--------Enter

Or save these commands in a bat file and run it everytime you need to fool Rapidshare server.Remember to clean up rapidshare cookie in your temp Internet files folder.

Now you should be ready to download as many files as you want from their server.

And there is this cool link: paste it in the browser and see
CODE
http://www.google.com/search?lr=&as_qdr=all&q=+.rar+OR+.zip+OR+.pdf+OR+.exe+site%3Arapidshare.de

Saturday, February 26, 2011

10 Reasons Why a System Crash --> Must Know

10 reasons why PCs crash --> must Know

 Fatal error: 
                        the system has become unstable or is busy," it says. "Enter to return to Windows or press Control-Alt-Delete to restart your computer. If you do this you will lose any unsaved information in all open applications."

You have just been struck by the Blue Screen of Death. Anyone who uses Mcft Windows will be familiar with this. What can you do? More importantly, how can you prevent it happening?


1 Hardware conflict

The number one reason why Windows crashes is hardware conflict. Each hardware device communicates to other devices through an interrupt request channel (IRQ). These are supposed to be unique for each device.

For example, a printer usually connects internally on IRQ 7. The keyboard usually uses IRQ 1 and the floppy disk drive IRQ 6. Each device will try to hog a single IRQ for itself.

If there are a lot of devices, or if they are not installed properly, two of them may end up sharing the same IRQ number. When the user tries to use both devices at the same time, a crash can happen. The way to check if your computer has a hardware conflict is through the following route:

* My Computer -> right click -> manage -> Device Manager.

Often if a device has a problem a yellow '!' appears next to its description in the Device Manager. Highlight Computer (in the Device Manager) and press Properties to see the IRQ numbers used by your computer. If the IRQ number appears twice, two devices may be using it.

Sometimes a device might share an IRQ with something described as 'IRQ holder for PCI steering'. This can be ignored. The best way to fix this problem is to remove the problem device and reinstall it.

Sometimes you may have to find more recent drivers on the internet to make the device function properly. A good resource is www.driverguide.com. If the device is a soundcard, or a modem, it can often be fixed by moving it to a different slot on the motherboard (be careful about opening your computer, as you may void the warranty).

When working inside a computer you should switch it off, unplug the mains lead and touch an unpainted metal surface to discharge any static electricity.

To be fair to Mcft, the problem with IRQ numbers is not of its making. It is a legacy problem going back to the first PC designs using the IBM 8086 chip. Initially there were only eight IRQs. Today there are 16 IRQs in a PC. It is easy to run out of them. There are plans to increase the number of IRQs in future designs.

2 Bad Ram

Ram (random-access memory) problems might bring on the blue screen of death with a message saying Fatal Exception Error. A fatal error indicates a serious hardware problem. Sometimes it may mean a part is damaged and will need replacing.

But a fatal error caused by Ram might be caused by a mismatch of chips. For example, mixing 70-nanosecond (70ns) Ram with 60ns Ram will usually force the computer to run all the Ram at the slower speed. This will often crash the machine if the Ram is overworked.

One way around this problem is to enter the BIOS settings and increase the wait state of the Ram. This can make it more stable. Another way to troubleshoot a suspected Ram problem is to rearrange the Ram chips on the motherboard, or take some of them out. Then try to repeat the circumstances that caused the crash. When handling Ram try not to touch the gold connections, as they can be easily damaged.

Parity error messages also refer to Ram. Modern Ram chips are either parity (ECC) or non parity (non-ECC). It is best not to mix the two types, as this can be a cause of trouble.

EMM386 error messages refer to memory problems but may not be connected to bad Ram. This may be due to free memory problems often linked to old Dos-based programmes.

3 BIOS settings

Every motherboard is supplied with a range of chipset settings that are decided in the factory. A common way to access these settings is to press the F2 or delete button during the first few seconds of a boot-up.

Once inside the BIOS, great care should be taken. It is a good idea to write down on a piece of paper all the settings that appear on the screen. That way, if you change something and the computer becomes more unstable, you will know what settings to revert to.

A common BIOS error concerns the CAS latency. This refers to the Ram. Older EDO (extended data out) Ram has a CAS latency of 3. Newer SDRam has a CAS latency of 2. Setting the wrong figure can cause the Ram to lock up and freeze the computer's display.

Mcft Windows is better at allocating IRQ numbers than any BIOS. If possible set the IRQ numbers to Auto in the BIOS. This will allow Windows to allocate the IRQ numbers (make sure the BIOS setting for Plug and Play OS is switched to 'yes' to allow Windows to do this.).

4 Hard disk drives


After a few weeks, the information on a hard disk drive starts to become piecemeal or fragmented. It is a good idea to defragment the hard disk every week or so, to prevent the disk from causing a screen freeze. Go to

*
My Computer -> right click -> manage -> System Tools -> Disk Defragmenter

This will start the procedure. You will be unable to write data to the hard drive (to save it) while the disk is defragmenting, so it is a good idea to schedule the procedure for a period of inactivity using the Task Scheduler.

The Task Scheduler should be one of the small icons on the bottom right of the Windows opening page (the desktop).

Some lockups and screen freezes caused by hard disk problems can be solved by reducing the read-ahead optimisation. This can be adjusted by going to

* Start-Settings-Control Panel-System Icon-Performance-File System-Hard Disk.

Hard disks will slow down and crash if they are too full. Do some housekeeping on your hard drive every few months and free some space on it. Open the Windows folder on the C drive and find the Temporary Internet Files folder. Deleting the contents (not the folder) can free a lot of space.

Empty the Recycle Bin every week to free more space. Hard disk drives should be scanned every week for errors or bad sectors. Go to

*
My Computer -> right click -> manage -> System Tools - ScanDisk

Otherwise assign the Task Scheduler to perform this operation at night when the computer is not in use.

5 Fatal OE exceptions and VXD errors


Fatal OE exception errors and VXD errors are often caused by video card problems.

These can often be resolved easily by reducing the resolution of the video display. Go to

* Start-Settings-Control Panel-Display-Settings

Here you should slide the screen area bar to the left. Take a look at the colour settings on the left of that window. For most desktops, high colour 16-bit depth is adequate.

If the screen freezes or you experience system lockups it might be due to the video card. Make sure it does not have a hardware conflict. Go to

*
My Computer -> right click -> manage -> System -> Device Manager

Here, select the + beside Display Adapter. A line of text describing your video card should appear. Select it (make it blue) and press properties. Then select Resources and select each line in the window. Look for a message that says No Conflicts.

If you have video card hardware conflict, you will see it here. Be careful at this point and make a note of everything you do in case you make things worse.

The way to resolve a hardware conflict is to uncheck the Use Automatic Settings box and hit the Change Settings button. You are searching for a setting that will display a No Conflicts message.

Another useful way to resolve video problems is to go to

*
My Computer -> right click -> manage -> System- Performance- Graphics

Here you should move the Hardware Acceleration slider to the left. As ever, the most common cause of problems relating to graphics cards is old or faulty drivers (a driver is a small piece of software used by a computer to communicate with a device).

Look up your video card's manufacturer on the internet and search for the most recent drivers for it.


6 Viruses


Often the first sign of a virus infection is instability. Some viruses erase the boot sector of a hard drive, making it impossible to start. This is why it is a good idea to create a Windows start-up disk. Go to

* Start-Settings-Control Panel-Add/Remove Programs

Here, look for the Start Up Disk tab. Virus protection requires constant vigilance.

A virus scanner requires a list of virus signatures in order to be able to identify viruses. These signatures are stored in a DAT file. DAT files should be updated weekly from the website of your antivirus software manufacturer.

An excellent antivirus programme is McAfee VirusScan by Network Associates ( www.nai.com). Another is Norton AntiVirus 2000, made by Symantec ( www.symantec.com).

7 Printers

The action of sending a document to print creates a bigger file, often called a postscript file.

Printers have only a small amount of memory, called a buffer. This can be easily overloaded. Printing a document also uses a considerable amount of CPU power. This will also slow down the computer's performance.

If the printer is trying to print unusual characters, these might not be recognised, and can crash the computer. Sometimes printers will not recover from a crash because of confusion in the buffer. A good way to clear the buffer is to unplug the printer for ten seconds. Booting up from a powerless state, also called a cold boot, will restore the printer's default settings and you may be able to carry on.

8 Software:

A common cause of computer crash is faulty or badly-installed software. Often the problem can be cured by uninstalling the software and then reinstalling it. Use Norton Uninstall or Uninstall Shield to remove an application from your system properly. This will also remove references to the programme in the System Registry and leaves the way clear for a completely fresh copy.

The System Registry can be corrupted by old references to obsolete software that you thought was uninstalled. Use Reg Cleaner by Jouni Vuorio to clean up the System Registry and remove obsolete entries. It works on Windows 95, Windows 98, Windows 98 SE (Second Edition), Windows Millennium Edition (ME), NT4 and Windows 2000.

Read the instructions and use it carefully so you don't do permanent damage to the Registry. If the Registry is damaged you will have to reinstall your operating system. Reg Cleaner can be obtained from www.jv16.org

Often a Windows problem can be resolved by entering Safe Mode. This can be done during start-up. When you see the message "Starting Windows" press F4. This should take you into Safe Mode.

Safe Mode loads a minimum of drivers. It allows you to find and fix problems that prevent Windows from loading properly.

Sometimes installing Windows is difficult because of unsuitable BIOS settings. If you keep getting SUWIN error messages (Windows setup) during the Windows installation, then try entering the BIOS and disabling the CPU internal cache. Try to disable the Level 2 (L2) cache if that doesn't work.

Remember to restore all the BIOS settings back to their former settings following installation.

9 Overheating


Central processing units (CPUs) are usually equipped with fans to keep them cool. If the fan fails or if the CPU gets old it may start to overheat and generate a particular kind of error called a kernel error. This is a common problem in chips that have been overclocked to operate at higher speeds than they are supposed to.

One remedy is to get a bigger better fan and install it on top of the CPU. Specialist cooling fans/heatsinks are available from www.computernerd.com or www.coolit.com

CPU problems can often be fixed by disabling the CPU internal cache in the BIOS. This will make the machine run more slowly, but it should also be more stable.

10 Power supply problems


With all the new construction going on around the country the steady supply of electricity has become disrupted. A power surge or spike can crash a computer as easily as a power cut.

If this has become a nuisance for you then consider buying a uninterrupted power supply (UPS). This will give you a clean power supply when there is electricity, and it will give you a few minutes to perform a controlled shutdown in case of a power cut.

It is a good investment if your data are critical, because a power cut will cause any unsaved data to be lost.

10 Security Enhancements

10 Fast and Free Security Enhancements
PC magazine.


Before you spend a dime on security, there are many precautions you can take that will protect you against the most common threats.

1. Check Windows Update and Office Update regularly (_http://office.microsoft.com/productupdates); have your Office CD ready. Windows Me, 2000, and XP users can configure automatic updates. Click on the Automatic Updates tab in the System control panel and choose the appropriate options.

2. Install a personal firewall. Both SyGate (_www.sygate.com) and ZoneAlarm (_www.zonelabs.com) offer free versions.


3. Install a free spyware blocker. Our Editors' Choice ("Spyware," April 22) was SpyBot Search & Destroy (_http://security.kolla.de). SpyBot is also paranoid and ruthless in hunting out tracking cookies.

4. Block pop-up spam messages in Windows NT, 2000, or XP by disabling the Windows Messenger service (this is unrelated to the instant messaging program). Open Control Panel | Administrative Tools | Services and you'll see Messenger. Right-click and go to Properties. Set Start-up Type to Disabled and press the Stop button. Bye-bye, spam pop-ups! Any good firewall will also stop them.

5. Use strong passwords and change them periodically. Passwords should have at least seven characters; use letters and numbers and have at least one symbol. A decent example would be f8izKro@l. This will make it much harder for anyone to gain access to your accounts.

6. If you're using Outlook or Outlook Express, use the current version or one with the Outlook Security Update installed. The update and current versions patch numerous vulnerabilities.

7. Buy antivirus software and keep it up to date. If you're not willing to pay, try Grisoft AVG Free Edition (Grisoft Inc., w*w.grisoft.com). And doublecheck your AV with the free, online-only scanners available at w*w.pandasoftware.com/activescan and _http://housecall.trendmicro.com.

8. If you have a wireless network, turn on the security features: Use MAC filtering, turn off SSID broadcast, and even use WEP with the biggest key you can get. For more, check out our wireless section or see the expanded coverage in Your Unwired World in our next issue.

9. Join a respectable e-mail security list, such as the one found at our own Security Supersite at _http://security.ziffdavis.com, so that you learn about emerging threats quickly and can take proper precautions.

10. Be skeptical of things on the Internet. Don't assume that e-mail "From:" a particular person is actually from that person until you have further reason to believe it's that person. Don't assume that an attachment is what it says it is. Don't give out your password to anyone, even if that person claims to be from "support."

Friday, February 25, 2011

How to create a bootable Windows XP SP1 CD (Nero):


 Step 1

Create 3 folders - C:\WINXPSP1, C:\SP1106 and C:\XPBOOT

Step 2

Copy the entire Windows XP CD into folder C:\WINXPSP1

Step 3

You will have to download the SP1 Update, which is 133MB.
Rename the Service Pack file to XP-SP1.EXE
Extract the Service Pack from the Run Dialog using the command:
C:\XP-SP1.EXE -U -X:C:\SP1106

Step 4

Open Start/Run... and type the command:
C:\SP1106\update\update.exe -s:C:\WINXPSP1

Click OK

Folder C:\WINXPSP1 contains: Windows XP SP1


How to Create a Windows XP SP1 CD Bootable

Step 1

Download xpboot.zip
Code:
Code:
http://thro.port5.com/xpboot.zip

( no download manager !! )

Extract xpboot.zip file (xpboot.bin) in to the folder C:\XPBOOT

Step 2

Start Nero - Burning Rom.
Select File > New... from the menu.
1.) Select CD-ROM (Boot)
2.) Select Image file from Source of boot image data
3.) Set Kind of emulation: to No Emulation
4.) Set Load segment of sectors (hex!): to 07C0
5.) Set Number of loaded sectors: to 4
6.) Press the Browse... button


Step 3

Select All Files (*.*) from File of type:
Locate boot.bin in the folder C:\XPBOOT

Step 4

Click ISO tab
Set File-/Directory length to ISO Level 1 (Max. of 11 = 8 + 3 chars)
Set Format to Mode 1
Set Character Set to ISO 9660
Check all Relax ISO Restrictions


Step 5

Click Label Tab
Select ISO9660 from the drop down box.
Enter the Volume Label as WB2PFRE_EN
Enter the System Identifier as WB2PFRE_EN
Enter the Volume Set as WB2PFRE_EN
Enter the Publisher as MICROSOFT CORPORATION
Enter the Data Preparer as MICROSOFT CORPORATION
Enter the Application as WB2PFRE_EN

* For Windows XP Professional OEM substitute WB2PFRE_EN with WXPOEM_EN
* For Windows XP Home OEM substitute WB2PFRE_EN with WXHOEM_EN

Step 6

Click Burn tab
Check Write
Check Finalize CD (No further writing possible!)
Set Write Method to Disk-At-Once

Press New button

Step 7

Locate the folder C:\WINXPSP1
Select everything in the folder and drag it to the ISO compilation panel.
Click the Write CD Dialog button.

Press Write

You're done.

What is Registry?

 What is the Registry?

The Registry is a database used to store settings and options for the 32 bit versions of Microsoft Windows including Windows 95, 98, ME and NT/2000. It contains information and settings for all the hardware, software, users, and preferences of the PC. Whenever a user makes changes to a Control Panel settings, or File Associations, System Policies, or installed software, the changes are reflected and stored in the Registry.


The physical files that make up the registry are stored differently depending on your version of Windows; under Windows 95 & 98 it is contained in two hidden files in your Windows directory, called USER.DAT and SYSTEM.DAT, for Windows Me there is an additional CLASSES.DAT file, while under Windows NT/2000 the files are contained seperately in the %SystemRoot%\System32\Config directory. You can not edit these files directly, you must use a tool commonly known as a "Registry Editor" to make any changes (using registry editors will be discussed later in the article).

The Structure of The Registry
The Registry has a hierarchal structure, although it looks complicated the structure is similar to the directory structure on your hard disk, with Regedit being similar to Windows Explorer.


Each main branch (denoted by a folder icon in the Registry Editor, see left) is called a Hive, and Hives contains Keys. Each key can contain other keys (sometimes referred to as sub-keys), as well as Values. The values contain the actual information stored in the Registry. There are three types of values; String, Binary, and DWORD - the use of these depends upon the context.

There are six main branches, each containing a specific portion of the information stored in the Registry. They are as follows:


* HKEY_CLASSES_ROOT - This branch contains all of your file association mappings to support the drag-and-drop feature, OLE information, Windows shortcuts, and core aspects of the Windows user interface.


* HKEY_CURRENT_USER - This branch links to the section of HKEY_USERS appropriate for the user currently logged onto the PC and contains information such as logon names, desktop settings, and Start menu settings.


* HKEY_LOCAL_MACHINE - This branch contains computer specific information about the type of hardware, software, and other preferences on a given PC, this information is used for all users who log onto this computer.


* HKEY_USERS - This branch contains individual preferences for each user of the computer, each user is represented by a SID sub-key located under the main branch.


* HKEY_CURRENT_CONFIG - This branch links to the section of HKEY_LOCAL_MACHINE appropriate for the current hardware configuration.


* HKEY_DYN_DATA - This branch points to the part of HKEY_LOCAL_MACHINE, for use with the Plug-&-Play features of Windows, this section is dymanic and will change as devices are added and removed from the system.


Each registry value is stored as one of five main data types:


* REG_BINARY - This type stores the value as raw binary data. Most hardware component information is stored as binary data, and can be displayed in an editor in hexadecimal format.


* REG_DWORD - This type represents the data by a four byte number and is commonly used for boolean values, such as "0" is disabled and "1" is enabled. Additionally many parameters for device driver and services are this type, and can be displayed in REGEDT32 in binary, hexadecimal and decimal format, or in REGEDIT in hexadecimal and decimal format.


* REG_EXPAND_SZ - This type is an expandable data string that is string containing a variable to be replaced when called by an application. For example, for the following value, the string "%SystemRoot%" will replaced by the actual location of the directory containing the Windows NT system files. (This type is only available using an advanced registry editor such as REGEDT32)


* REG_MULTI_SZ - This type is a multiple string used to represent values that contain lists or multiple values, each entry is separated by a NULL character. (This type is only available using an advanced registry editor such as REGEDT32)


* REG_SZ - This type is a standard string, used to represent human readable text values.


Other data types not available through the standard registry editors include:


* REG_DWORD_LITTLE_ENDIAN - A 32-bit number in little-endian format.
* REG_DWORD_BIG_ENDIAN - A 32-bit number in big-endian format.
* REG_LINK - A Unicode symbolic link. Used internally; applications should not use this type.
* REG_NONE - No defined value type.
* REG_QWORD - A 64-bit number.
* REG_QWORD_LITTLE_ENDIAN - A 64-bit number in little-endian format.
* REG_RESOURCE_LIST - A device-driver resource list.


Editing The Registry

The Registry Editor (REGEDIT.EXE) is included with most version of Windows (although you won't find it on the Start Menu) it enables you to view, search and edit the data within the Registry. There are several methods for starting the Registry Editor, the simplest is to click on the Start button, then select Run, and in the Open box type "regedit", and if the Registry Editor is installed it should now open and look like the image below.

An alternative Registry Editor (REGEDT32.EXE) is available for use with Windows NT/2000, it includes some additional features not found in the standard version, including; the ability to view and modify security permissions, and being able to create and modify the extended string values REG_EXPAND_SZ & REG_MULTI_SZ.

Create a Shortcut to Regedit
This can be done by simply right-clicking on a blank area of your desktop, selecting New, then Shortcut, then in the Command line box enter "regedit.exe" and click Next, enter a friendly name (e.g. 'Registry Editor') then click Finish and now you can double click on the new icon to launch the Registry Editor.

Using Regedit to modify your Registry
Once you have started the Regedit you will notice that on the left side there is a tree with folders, and on the right the contents (values) of the currently selected folder.

Like Windows explorer, to expand a certain branch (see the structure of the registry section), click on the plus sign [+] to the left of any folder, or just double-click on the folder. To display the contents of a key (folder), just click the desired key, and look at the values listed on the right side. You can add a new key or value by selecting New from the Edit menu, or by right-clicking your mouse. And you can rename any value and almost any key with the same method used to rename files; right-click on an object and click rename, or click on it twice (slowly), or just press F2 on the keyboard. Lastly, you can delete a key or value by clicking on it, and pressing Delete on the keyboard, or by right-clicking on it, and choosing Delete.

Note: it is always a good idea to backup your registry before making any changes to it. It can be intimidating to a new user, and there is always the possibility of changing or deleting a critical setting causing you to have to reinstall the whole operating system. It's much better to be safe than sorry!

Importing and Exporting Registry Settings

A great feature of the Registry Editor is it's ability to import and export registry settings to a text file, this text file, identified by the .REG extension, can then be saved or shared with other people to easily modify local registry settings. You can see the layout of these text files by simply exporting a key to a file and opening it in Notepad, to do this using the Registry Editor select a key, then from the "Registry" menu choose "Export Registry File...", choose a filename and save. If you open this file in notepad you will see a file similar to the example below:

Quote:

REGEDIT4

[HKEY_LOCAL_MACHINE\SYSTEM\Setup]
"SetupType"=dword:00000000
"CmdLine"="setup -newsetup"
"SystemPrefix"=hex:c5,0b,00,00,00,40,36,02


The layout is quite simple, REGEDIT4 indicated the file type and version, [HKEY_LOCAL_MACHINE\SYSTEM\Setup] indicated the key the values are from, "SetupType"=dword:00000000 are the values themselves the portion after the "=" will vary depending on the type of value they are; DWORD, String or Binary.

So by simply editing this file to make the changes you want, it can then be easily distributed and all that need to be done is to double-click, or choose "Import" from the Registry menu, for the settings to be added to the system Registry.

Deleting keys or values using a REG file
It is also possible to delete keys and values using REG files. To delete a key start by using the same format as the the REG file above, but place a "-" symbol in front of the key name you want to delete. For example to delete the [HKEY_LOCAL_MACHINE\SYSTEM\Setup] key the reg file would look like this:

Quote:

REGEDIT4

[-HKEY_LOCAL_MACHINE\SYSTEM\Setup]


The format used to delete individual values is similar, but instead of a minus sign in front of the whole key, place it after the equal sign of the value. For example, to delete the value "SetupType" the file would look like:

Quote:

REGEDIT4

[HKEY_LOCAL_MACHINE\SYSTEM\Setup]
"SetupType"=-


Use this feature with care, as deleting the wrong key or value could cause major problems within the registry, so remember to always make a backup first.

Regedit Command Line Options
Regedit has a number of command line options to help automate it's use in either batch files or from the command prompt. Listed below are some of the options, please note the some of the functions are operating system specific.


* regedit.exe [options] [filename] [regpath]
* [filename] Import .reg file into the registry
* /s [filename] Silent import, i.e. hide confirmation box when importing files
* /e [filename] [regpath] Export the registry to [filename] starting at [regpath]
e.g. regedit /e file.reg HKEY_USERS\.DEFAULT
* /L:system Specify the location of the system.dat to use
* /R:user Specify the location of the user.dat to use
* /C [filename] Compress (Windows 98)
* /D [regpath] Delete the specified key (Windows 98)

Maintaining the Registry

How can you backup and restore the Registry?

Windows 95


Microsoft included a utility on the Windows 95 CD-ROM that lets you create backups of the Registry on your computer. The Microsoft Configuration Backup program, CFGBACK.EXE, can be found in the \Other\Misc\Cfgback directory on the Windows 95 CD-ROM. This utility lets you create up to nine different backup copies of the Registry, which it stores, with the extension RBK, in your \Windows directory. If your system is set up for multiple users, CFGBACK.EXE won't back up the USER.DAT file.

After you have backed up your Registry, you can copy the RBK file onto a floppy disk for safekeeping. However, to restore from a backup, the RBK file must reside in the \Windows directory. Windows 95 stores the backups in compressed form, which you can then restore only by using the CFGBACK.EXE utility.

Windows 98
Microsoft Windows 98 automatically creates a backup copy of the registry every time Windows starts, in addition to this you can manually create a backup using the Registry Checker utility by running SCANREGW.EXE from Start | Run menu.

What to do if you get a Corrupted Registry
Windows 95, 98 and NT all have a simple registry backup mechanism that is quite reliable, although you should never simply rely on it, remember to always make a backup first!

Windows 95
In the Windows directory there are several hidden files, four of these will be SYSTEM.DAT & USER.DAT, your current registry, and SYSTEM.DA0 & USER.DA0, a backup of your registry. Windows 9x has a nice reature in that every time it appears to start successfully it will copy the registry over these backup files, so just in case something goes wrong can can restore it to a known good state. To restore the registry follow these instruction:
[list=1]
* Click the Start button, and then click Shut Down.

* Click Restart The Computer In MS-DOS Mode, then click Yes.

* Change to your Windows directory. For example, if your Windows directory is c:\windows, you would type the following:

cd c:\windows

* Type the following commands, pressing ENTER after each one. (Note that SYSTEM.DA0 and USER.DA0 contain the number zero.)

attrib -h -r -s system.dat
attrib -h -r -s system.da0
copy system.da0 system.dat
attrib -h -r -s user.dat
attrib -h -r -s user.da0
copy user.da0 user.dat

* Restart your computer.


Following this procedure will restore your registry to its state when you last successfully started your computer.

If all else fails, there is a file on your hard disk named SYSTEM.1ST that was created when Windows 95 was first successfully installed. If necessary you could also change the file attributes of this file from read-only and hidden to archive to copy the file to C:\WINDOWS\SYSTEM.DAT.

Windows NT


On Windows NT you can use either the "Last Known Good" option or RDISK to restore to registry to a stable working configuration.

How can I clean out old data from the Registry?


Although it's possible to manually go through the Registry and delete unwanted entries, Microsoft provides a tool to automate the process, the program is called RegClean. RegClean analyzes Windows Registry keys stored in a common location in the Windows Registry. It finds keys that contain erroneous values, it removes them from the Windows Registry after having recording those entries in the Undo.Reg file.

Wednesday, February 23, 2011

Best Keyboard Shortcuts

Getting used to using your keyboard exclusively and leaving your mouse behind will make you much more efficient at performing any task on any Windows system.


Windows key + R = Run menu

This is usually followed by:
cmd = Command Prompt
iexplore + "web address" = Internet Explorer
compmgmt.msc = Computer Management
dhcpmgmt.msc = DHCP Management
dnsmgmt.msc = DNS Management
services.msc = Services
eventvwr = Event Viewer
dsa.msc = Active Directory Users and Computers
dssite.msc = Active Directory Sites and Services
Windows key + E = Explorer

ALT + Tab = Switch between windows

ALT, Space, X = Maximize window

CTRL + Shift + Esc = Task Manager

Windows key + Break = System properties

Windows key + F = Search

Windows key + D = Hide/Display all windows

CTRL + C = copy

CTRL + X = cut

CTRL + V = paste

Also don't forget about the "Right-click" key next to the right Windows key on your keyboard. Using the arrows and that key can get just about anything done once you've opened up any program.


Keyboard Shortcuts

[Alt] and [Esc] Switch between running applications

[Alt] and letter Select menu item by underlined letter

[Ctrl] and [Esc] Open Program Menu

[Ctrl] and [F4] Close active document or group windows (does not work with some applications)

[Alt] and [F4] Quit active application or close current window

[Alt] and [-] Open Control menu for active document

Ctrl] Lft., Rt. arrow Move cursor forward or back one word

Ctrl] Up, Down arrow Move cursor forward or back one paragraph

[F1] Open Help for active application

Windows+M Minimize all open windows

Shift+Windows+M Undo minimize all open windows

Windows+F1 Open Windows Help

Windows+Tab Cycle through the Taskbar buttons

Windows+Break Open the System Properties dialog box


acessability shortcuts

Right SHIFT for eight seconds........ Switch FilterKeys on and off.

Left ALT +left SHIFT +PRINT SCREEN....... Switch High Contrast on and off.

Left ALT +left SHIFT +NUM LOCK....... Switch MouseKeys on and off.

SHIFT....... five times Switch StickyKeys on and off.

NUM LOCK...... for five seconds Switch ToggleKeys on and off.

explorer shortcuts

END....... Display the bottom of the active window.

HOME....... Display the top of the active window.

NUM LOCK+ASTERISK....... on numeric keypad (*) Display all subfolders under the selected folder.

NUM LOCK+PLUS SIGN....... on numeric keypad (+) Display the contents of the selected folder.

NUM LOCK+MINUS SIGN....... on numeric keypad (-) Collapse the selected folder.

LEFT ARROW...... Collapse current selection if it's expanded, or select parent folder.

RIGHT ARROW....... Display current selection if it's collapsed, or select first subfolder.


Type the following commands in your Run Box (Windows Key + R) or Start Run

devmgmt.msc = Device Manager
msinfo32 = System Information
cleanmgr = Disk Cleanup
ntbackup = Backup or Restore Wizard (Windows Backup Utility)
mmc = Microsoft Management Console
excel = Microsoft Excel (If Installed)
msaccess = Microsoft Access (If Installed)
powerpnt = Microsoft PowerPoint (If Installed)
winword = Microsoft Word (If Installed)
frontpg = Microsoft FrontPage (If Installed)
notepad = Notepad
wordpad = WordPad
calc = Calculator
msmsgs = Windows Messenger
mspaint = Microsoft Paint
wmplayer = Windows Media Player
rstrui = System Restore
netscp6 = Netscape 6.x
netscp = Netscape 7.x
netscape = Netscape 4.x
waol = America Online
control = Opens the Control Panel
control printers = Opens the Printers Dialog


internetbrowser

type in u're adress "google", then press [Right CTRL] and [Enter]
add www. and .com to word and go to it


For Windows XP:

Copy. CTRL+C
Cut. CTRL+X
Paste. CTRL+V
Undo. CTRL+Z
Delete. DELETE
Delete selected item permanently without placing the item in the Recycle Bin. SHIFT+DELETE
Copy selected item. CTRL while dragging an item
Create shortcut to selected item. CTRL+SHIFT while dragging an item
Rename selected item. F2
Move the insertion point to the beginning of the next word. CTRL+RIGHT ARROW
Move the insertion point to the beginning of the previous word. CTRL+LEFT ARROW
Move the insertion point to the beginning of the next paragraph. CTRL+DOWN ARROW
Move the insertion point to the beginning of the previous paragraph. CTRL+UP ARROW
Highlight a block of text. CTRL+SHIFT with any of the arrow keys
Select more than one item in a window or on the desktop, or select text within a document. SHIFT with any of the arrow keys
Select all. CTRL+A
Search for a file or folder. F3
View properties for the selected item. ALT+ENTER
Close the active item, or quit the active program. ALT+F4
Opens the shortcut menu for the active window. ALT+SPACEBAR
Close the active document in programs that allow you to have multiple documents open simultaneously. CTRL+F4
Switch between open items. ALT+TAB
Cycle through items in the order they were opened. ALT+ESC
Cycle through screen elements in a window or on the desktop. F6
Display the Address bar list in My Computer or Windows Explorer. F4
Display the shortcut menu for the selected item. SHIFT+F10
Display the System menu for the active window. ALT+SPACEBAR
Display the Start menu. CTRL+ESC
Display the corresponding menu. ALT+Underlined letter in a menu name
Carry out the corresponding command. Underlined letter in a command name on an open menu
Activate the menu bar in the active program. F10
Open the next menu to the right, or open a submenu. RIGHT ARROW
Open the next menu to the left, or close a submenu. LEFT ARROW
Refresh the active window. F5
View the folder one level up in My Computer or Windows Explorer. BACKSPACE
Cancel the current task. ESC
SHIFT when you insert a CD into the CD-ROM drive Prevent the CD from automatically playing.

Use these keyboard shortcuts for dialog boxes:

To Press
Move forward through tabs. CTRL+TAB
Move backward through tabs. CTRL+SHIFT+TAB
Move forward through options. TAB
Move backward through options. SHIFT+TAB
Carry out the corresponding command or select the corresponding option. ALT+Underlined letter
Carry out the command for the active option or button. ENTER
Select or clear the check box if the active option is a check box. SPACEBAR
Select a button if the active option is a group of option buttons. Arrow keys
Display Help. F1
Display the items in the active list. F4
Open a folder one level up if a folder is selected in the Save As or Open dialog box. BACKSPACE

If you have a Microsoft Natural Keyboard, or any other compatible keyboard that includes the Windows logo key and the Application key , you can use these keyboard shortcuts:


Display or hide the Start menu. WIN Key
Display the System Properties dialog box. WIN Key+BREAK
Show the desktop. WIN Key+D
Minimize all windows. WIN Key+M
Restores minimized windows. WIN Key+Shift+M
Open My Computer. WIN Key+E
Search for a file or folder. WIN Key+F
Search for computers. CTRL+WIN Key+F
Display Windows Help. WIN Key+F1
Lock your computer if you are connected to a network domain, or switch users if you are not connected to a network domain. WIN Key+ L
Open the Run dialog box. WIN Key+R
Open Utility Manager. WIN Key+U

accessibility keyboard shortcuts:

Switch FilterKeys on and off. Right SHIFT for eight seconds
Switch High Contrast on and off. Left ALT+left SHIFT+PRINT SCREEN
Switch MouseKeys on and off. Left ALT +left SHIFT +NUM LOCK
Switch StickyKeys on and off. SHIFT five times
Switch ToggleKeys on and off. NUM LOCK for five seconds
Open Utility Manager. WIN Key+U

shortcuts you can use with Windows Explorer:


Display the bottom of the active window. END
Display the top of the active window. HOME
Display all subfolders under the selected folder. NUM LOCK+ASTERISK on numeric keypad (*)
Display the contents of the selected folder. NUM LOCK+PLUS SIGN on numeric keypad (+)
Collapse the selected folder. NUM LOCK+MINUS SIGN on numeric keypad (-)
Collapse current selection if it's expanded, or select parent folder. LEFT ARROW
Display current selection if it's collapsed, or select first subfolder. RIGHT ARROW

Monday, February 21, 2011

How To Close Port 445 In Windows XP For Good


Even after you disable local file and print sharing, Windows XP still leaves port 445 open and listening for incoming connections. If you are not using local networking, this can pose a security risk. To close this port you need to make a quick change to an entry in the Windows registry.


NOTE: It is very important that if you do not feel comfortable editing the registry or have never done it before that you avoid doing this right away and learn more about the Windows registry. Changing the wrong setting or changing a setting incorrectly can cause Windows to not function correctly.

Please be advised that Vectro Security takes no responsibility for any damage caused to the operating system.

Here are the step-by-step instructions to close port 445 in Windows XP:

Click "Start"

Click "Run..."

Where it says "Open:" type "regedit"

Navigate to HKLM\System\CurrentControlSet\Services\NetBT\Parameters

Find the value "TransportBindName" and right-click it to open up a menu of options.

Click "Modify" (it is in bold text)

Where it says "Value data:" delete whatever is in the box so the box is blank. The blank entry is what closes the port.

Click "OK"

Close the registry and reboot.

That takes care of it, now you are much safer from other machines on your local network, or if you are plugged into a cable modem without a router.

Windows XP SP3 Corporate Student Edition

Windows XP SP3 Corporate Student Edition – the so-called “student” version of Windows XP, it is used for educational purposes only and therefore it is designed for multiple installations without further contact with black-list Windows Genuine Advantage. This version of Windows XP SP3 does not require activation, and is the official validation of Microsoft. Integrated updates on February 9, 2011
Features:

- Does not require input of the key
- Being tested for validity MS
- Patched TCP IP, themes.
- Added driver Driverpacks base 10.06


Added:

- Framework all in one 1.1 – 4.0
- Internet explorer 8
- Firefox 3.6.13 with added extension plugins
- Windows media player 11
- Directx 9 June 2010
- Directx Managed Code 1.1.0
- Flash 10.2.152.26
- Shockwave 11.5.9.620
- Java 6 update 23
- Foxit Reader 4.3.1
- Winrar 3.93 regged
- Lclock 1.62b
- Vlc media player 1.1.7
- Kels runtimes 7.2
- C + + 2005
- C + + 2008
- C + + 2010
- Msn.Live.Messenger.9.0.14.0.
8117.416 web-setup on desktop

Deleted:

- Music Samples
- Windows Messenger 4.7
- Tour


Delete the folder:

SUPPORT, VALUEADD, DOCS, WIN9XMIG, WIN9XUPG, WINNTUPG


Updates (patches):

- Updated windows hotfixes till feb 9th 2011
- Updated Internet explorer 8 hotfixes till feb 9th 2011
- Updated Firefox 3.6.13 extensions plugins till jan 12th 2011
- SFC (windows File Protection) Disabled
- Numlock off default
- Classic control panel Enabled
- Updated Foxit Reader 4.3.1
- Updated Vlc media player 1.1.7
- Updated Kels runtimes 7.2
- Updated MassStorage 11.01
- Updated Shockwave 11.5.9.620
- Updated Flash 10.2.152.26

Saturday, February 19, 2011

Khatra Virus..!!

In this post, am gonna tell you guys about a blowing Virus, which i got over my pc recently..

Its Khatra virus..


This virus has some symptoms when ever you try to open browser or search to remove khatra.exe the browser will automatically close, you can’t not delete khatra.exe or gHost.exe or Xplorer.exe which are created by the same virus as these processes will keep running.


Follow the procedure below
 
1. Open Task Manager but if task manager is blocked then unblock task manager and click the process tab, found these process named regsvr.exe(if found there), gHost.exe, khatra.exe and  Xplorer.exe, right click on all these process and select end process tree 
 
2. Open Start Menu >> Run, type cmd and click Ok button


3. Now download and install everything search tool 

4. Run Everything and type the virus exe names one by one ( khatra.exe, gHost.exe, Xplorer.exe ) and delete all the copies found on your computer anywhere.

5. Now Open start menu >> run, type regedit or if registry editing is blocked then unblock registry editing
 
6. Press ctrl+f and find the registry keys with names khatra,gHost,Xplorer and delete the values you find with these names.


Thats it..
You are Done..

Friday, February 18, 2011

Connecting Two Systems Via Lan-Easy Tutorial


In this tutorial we see how to connect to computers together to share files and resources. We can go about it either the wired way or the wireless one. But the wireless way is pretty expensive. So in this tut, we consider the wired way.

To do it the wired way, we need a RJ45 crossover ethernet cable. We choose this  instead of hubs and switches as it is more cost effective.

To create a LAN network using a crossover cable, we just need a crossover (Cross crimped RJ45 / CAT5) cable and a LAN (Ethernet) card in both computers. Most computer motherboards have onboard ethernet these days.

We refer to the 2 computers as First PC and Second PC.

First of all, we connect the cross crimped ethernet cable in the LAN RJ45 ports of both the computers.
Now we start with configuring the computers.

First PC:

1. Just right-click “My Computer” and click Properties.
2. Select the “Computer Name” tab and click the “Change” button.
3. Change the computer name to whatever you want, here we name it First PC. Change the workgroup to WG. (The workgroup name should be the same in both computers)
4. Click OK.


Now, to configure the TCP/IP connection settings,

1. Goto “Control Panel” >> “Network connections”
2. Right-click on your LAN connection and click “Properties”. In the “General” tab, select “Internet Protocol (TCP/IP)”. Click the “Properties” button.
3. Set the Values
IP Address – 192.168.0.1
Subnet Mask – 255.255.255.0
Default Gateway – 192.168.0.2
4. Click OK and you are done for First PC.


Second PC:

1. Just right-click “My Computer” and click Properties.
2. Select the “Computer Name” tab and click the “Change” button.
3. Change the computer name to Second PC. Change the workgroup to WG. (The workgroup name should be the same in both computers)
4. Click OK.


Now, to configure the TCP/IP connection settings,

1. Goto “Control Panel” >> “Network connections”
2. Right-click on your LAN connection and click “Properties”. In the “General” tab, select “Internet Protocol (TCP/IP)”. Click the “Properties” button.
3. Set the Values
IP Address – 192.168.0.2
Subnet Mask – 255.255.255.0
Default Gateway – 192.168.0.1
4. Click OK and you are done for Second PC as well.


If you have done the above part correctly, the computers will have detected each other. If they don’t, just restart both the computers.

You can access the other computer in “My network Places”. You can also play multi-player games using this connection.

Remember:

On windows xp click start/my network places / view network connections. Right click on ”local area connection”, Then click on properties. Double click on ”internet protocol (TCP/IP)”
on windows vista


click start/network/network and sharing center /manage network connections
right click on ”local area connection” than click on properties. double click on ”internet protocol (TCP/IP)”


On windows vista, click start/network/network and sharing center /manage network connections, right click on ”local area connection” , then click on properties. Double click on ”internet protocol (TCP/IP)”

Notepad magic™


• Type excatly the sentence which is below this

• “This mad guy David” (w/o quotes) (David is my name. Not any other David I’m
sorry to use this name )


• Save that with any name and re-opens it


• Your system also knows that ‘David’ is not mad


• But really the fact is , we cannot write the following sequence in notepad :

• 4 3 3 5


• This(4) mad(3) guy(3) David(5)


• Thats the matter…..

Increase Your Internet Speed


windows will blocks 20% of your internet speed for updates and for others


· Press (win logo+R) to open run window

· And then type ‘gpedit.msc’ press enter

· Go to below path of group policy

· Computer configiration >>adminstrative templates >> network >>Qos packet

· There you can see a panel at right named setting

· There you can find fourth option “limit reservable band width”

· If it is not configured then double click it then choose enable

· And then edit the bandwidth limit(%)and set it to “0” (default 20 erase ‘20’ and mark it as ‘0’)

· Click apply and close group

· Reboot compulsory to make it work

You can also set your modem speed at 115 mbps:

· How to connect modem at 115 kbs

· first go to control panel in it click on phone and modem options in it click on modem in modem

· click on properties after that click on advanced in advanced u will see written”exta initiation commands there write “AT&FX” and restart the computer and get conneted in 115kbs. 

Host A Web Server on Your Home computer


Opera Unite :


create a web server using your home computer by using HFS or Http file server. This solution uses a combination of technique which helps you create a file server for downloading music files or even hosting a small site for your family.

Today Opera came out with an extra ordinary application called as Opera Unite. This application turns any computer or device running Opera into a Web server
.  So how does it work ? Its pretty much the same what HFS was doing but its much more advanced.
  • First get a unique number for your computer.
  • Which is then linked to your computer.
  • Then you access the URL which in turn connects to the software running on your computer.
The advantage you get is all your IP is tracked automatically which was being done by the No-IP account.  I would call it as Just plug and play as you dont have to worry about configuring too much here.
You can find the complete and in depth tutorial by Opera Development Blog ( Via Boy Genius )


 FETCH LINK:


http://rs768.rapidshare.com/files/292619999/_www.dl4all.com_Opera_Unite_10.10.1833_Beta_Multilanguage_Portable_kastrioTT_.rar

COOKIE POISONING OR STEALING


When “Cookie” the term comes to my mind, I THINK about Hot Bakes wat we prepare if my were friends together, doesn’t even care bout logical Shit(Cookie)..But this time need to give some shits to care about,Coz it Annoys a Lot more than before n one of the major threat in web applications..!!
So let see Wat n all the definitions available for COOKIES In the Planet:

“”Cookies are programs that Web sites put on your hard disk. They sit on your computer gathering information about you and everything you do on the Internet, and whenever the Web site wants to it can download all of the information the cookie has collected.””
[wrong]

Coookies are programs, Are u gone Insane,Heckkkkk….!! It’s a Parameter Used in the Web Prg Lanuage, used By POST,GET Methods..


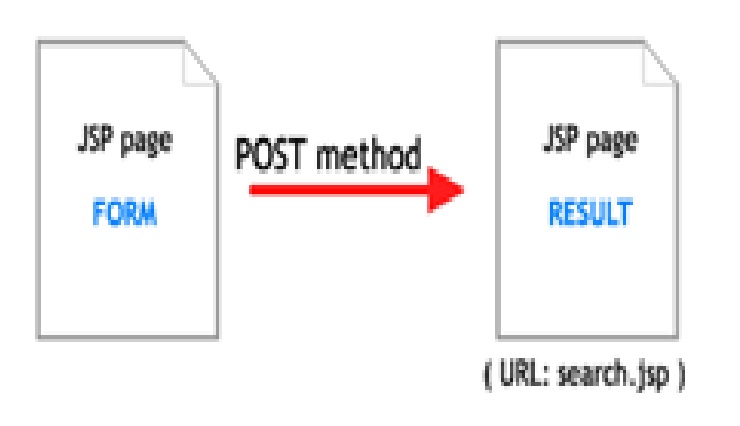
POST-> Is for Posting the Contents In the web browser login page or form…Wat was Stored in Users Web Browser Or Harddisk


GET METHOD->Used to retrieve the Stored Contents on the Harddisk With the proper Mathching of ID From the webserver,,!! The records have been Pulled and Showed In Home LOGIN PAGE Or FORM Page by Post Methods..!!


And Niggas Here Is the r8 Definition, Don ask Stupid Ques..Right is Always Right One..

“”A cookie is a piece of text that a Web server can store on a user's hard disk. Cookies allow a Web site to store information on a user's machine and later retrieve it. The pieces of information are stored as name-value pairs.””


So We now Knew Cookies Sits on ur hard Drive(Class Bench) With ID Name(Student Name), The teacher Calls KEVIN, “Come Forward With ur Assignment”, Probably Kevin gets his ass along with him to the Teachers Cabin, So if Cookie with ID name Called By Tha Web Server it must Go..FATE…!! lol


The most common place for them to Place their Assignment Safe is in d directory called c:windowscookies. When I look in that directory on my machine(NO LATE NIGHT ACTIVITY),LOL…SOMETIMES AM A BAD AS PSYCHO…..!!.But I find 165 files. Each file is a text file that contains name-value pairs, and there is one file for each Web site that has placed cookies on my machine.


Cookie Poisoning attacks involve the modification of the contents [[[i.e Like Changin the Clothes and appearences, if u chased By F.B.I In newyork City streets]]] of a cookie (personal information stored in a Web user's computer) in order to bypass security mechanisms. Using cookie poisoning attacks, attackers can gain unauthorized Access[lLIKE ILLEGAL AFFAIR…!! lol] information about another user and steal their identity.


Ok Be Serious Now..!! Gotta Pay more attention

Detail Portrays OF Scenario :
Many Web applications use cookies to save information (user IDs, passwords, account numbers, time stamps, etc.).about timestamp Protocol We Discuss Later In This Weeks threads,TRUST ME..Coz it’s a Imp One too, In TCP/IP Prg or in Network prog…!!!lets comeback.. The cookies stored on a user's hard drive maintain information that allows the applications to authenticate the user identity, speed up transactions, monitor behavior, and personalize content presented to the user based on identity and preferences. For example, when ur GF/BF/Spouse/Babysitter(Do u think Babysitter use Computers,ter are some hi tech Babysitters too in U.S Those are HOT,Hard to rent them) logs into a Web site that requires authentication, a login CGI validates his username and password and sets a cookie with a numerical identifier in the user's browser. When the user browses to another page, another CGI (say, preferences.asp) retrieves the cookie and displays personalized content according to the values contained in the cookie.

Cookie poisoning is in fact a Parameter Tampering attack As I Said Before in the Introduction Part, where the parameters are stored in a cookie. In many cases cookie poisoning is more useful than other Parameter Tampering attacks because programmers[Creative Thinkers Who Lives in a imaginary World ill say] store sensitive information in the allegedly invisible cookie.

For example, consider the following request: This is Just an Fictious link to make u understand better.:)
GET /store/buy.asp?checkout=yes HTTP/1.0 Host: www.hackersbay.in
Accept: */* Referrer: http://www.hackersbay.in/showprods.asp
Cookie: SESSIONID=570321ASDD23SA2321; BasketSize=3; Item1=2892;
Item2=3210; Item3=9942; TotalPrice=16044;

In this example, the dynamic page requested by the browser is called buy.asp and the browser sends the parameter checkout to the Web server with a yes value, indicating that the user wants to finalize his purchase. The request includes a cookie that contains the following parameters: SESSIONID, which is a unique identification string that associates the user with the site, BasketSize (how many items are in the purchase), the price of each item and the TotalPrice. When executed by the Web server, buy.asp retrieves the cookie from the user, analyzes the cookie's parameters and charges the user account according to the TotalPrice parameter. An attacker can change, for example, the TotalPrice parameter in order to get a "special discount".
Since programmers rely on cookies as a location for storing parameters, all parameter attacks including SQL Injection, Cross-Site Scripting, and Buffer Overflow can be executed using cookie poisoning.


Thursday, February 17, 2011

Beep Codes Error Codes


Standard Original IBM POST Error Codes

Code Description


1 short beep System is OK
2 short beeps POST Error – error code shown on screen No beep Power supply or system board problem Continuous beep Power supply, system board, or keyboard problem Repeating short beeps Power supply or system board problem

 
1 long, 1 short beep System board problem
1 long, 2 short beeps Display adapter problem (MDA, CGA)
1 long, 3 short beeps Display adapter problem (EGA)
3 long beeps 3270 keyboard card
IBM POST Diagnostic Code Descriptions
Code Description
100 – 199 System Board
200 – 299 Memory
300 – 399 Keyboard
400 – 499 Monochrome Display
500 – 599 Colour/Graphics Display
600 – 699 Floppy-disk drive and/or Adapter
700 – 799 Math Coprocessor
900 – 999 Parallel Printer Port
1000 – 1099 Alternate Printer Adapter
1100 – 1299 Asynchronous Communication Device, Adapter, or Port
1300 – 1399 Game Port
1400 – 1499 Colour/Graphics Printer
1500 – 1599 Synchronous Communication Device, Adapter, or Port
1700 – 1799 Hard Drive and/or Adapter
1800 – 1899 Expansion Unit (XT)
2000 – 2199 Bisynchronous Communication Adapter
2400 – 2599 EGA system-board Video (MCA)
3000 – 3199 LAN Adapter
4800 – 4999 Internal Modem
7000 – 7099 Phoenix BIOS Chips
7300 – 7399 3.5″ Disk Drive
8900 – 8999 MIDI Adapter
11200 – 11299 SCSI Adapter
21000 – 21099 SCSI Fixed Disk and Controller
21500 – 21599 SCSI CD-ROM System

AMI BIOS Beep Codes
Code Description

1 Short Beep System OK
2 Short Beeps Parity error in the first 64 KB of memory
3 Short Beeps Memory failure in the first 64 KB
4 Short Beeps Memory failure in the first 64 KB Operational of memory
or Timer 1 on the motherboard is not functioning
5 Short Beeps The CPU on the motherboard generated an error
6 Short Beeps The keyboard controller may be bad. The BIOS cannot switch to protected mode
7 Short Beeps The CPU generated an exception interrupt
8 Short Beeps The system video adapter is either missing, or its memory is faulty
9 Short Beeps The ROM checksum value does not match the value encoded in the BIOS
10 Short Beeps The shutdown register for CMOS RAM failed
11 Short Beeps The external cache is faulty
1 Long, 3 Short Beeps Memory Problems
1 Long, 8 Short Beeps Video Card Problems

Phoenix BIOS Beep Codes
Note – Phoenix BIOS emits three sets of beeps, separated by a brief pause.

Code Description
1-1-3 CMOS read/write failure
1-1-4 ROM BIOS checksum error
1-2-1 Programmable interval timer failure
1-2-2 DMA initialisation failure
1-2-3 DMA page register read/write failure
1-3-1 RAM refresh verification failure
1-3-3 First 64k RAM chip or data line failure
1-3-4 First 64k RAM odd/even logic failure
1-4-1 Address line failure first 64k RAM
1-4-2 Parity failure first 64k RAM
2-_-_ Faulty Memory
3-1-_ Faulty Motherboard
3-2-4 Keyboard controller Test failure
3-3-4 Screen initialisation failure
3-4-1 Screen retrace test failure
3-4-2 Search for video ROM in progress
4-2-1 Timer tick interrupt in progress or failure
4-2-2 Shutdown test in progress or failure
4-2-3 Gate A20 failure
4-2-4 Unexpected interrupt in protected mode
4-3-1 RAM test in progress or failure>ffffh
4-3-2 Faulty Motherboard
4-3-3 Interval timer channel 2 test or failure
4-3-4 Time of Day clock test failure
4-4-1 Serial port test or failure
4-4-2 Parallel port test or failure
4-4-3 Math coprocessor test or failure
Low 1-1-2 System Board select failure
Low 1-1-3 Extended CMOS RAM failure

Create a Hidden Account in Windows XP


Do you want to create an Account that nobody can see? 

Alright Today I am going to teach you how to create a Hidden Account in Windows XP.


Since we are going to do all the Editing in Window Registry it is Recommended to Back Up the Registry before going Further.

After you have Backed up your registry follow the Steps to Create your Hidden Account:

First Goto Start -> Run -> Type regedit -> Enter

In the Left Menu goto,

HKEY_LOCAL_MACHINE\Software\Microsoft\WindowsNT\CurrentVersion\Winlogon\SpecialAccounts\UserList

In the Right pane, Right click -> New -> String Value
Right click on the new String Value and click Rename
Type the Name of the Account you want to hide.

Hit Enter then Right click on the String Value again and Change value to 0 which hides it. If you want it to be Visible to all Enter the Value 1.

Now Save and Exit the Registry and Logoff.

Goto welcome screen and Hit ctrl+alt+del twice to bring up Logon prompt

Type hidden Accounts name and password

Enjoy!!!